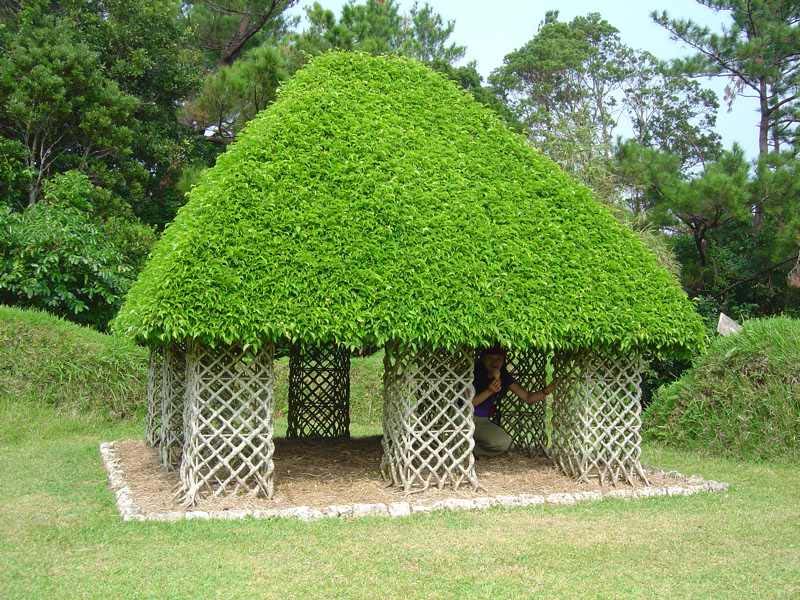
 Nevermind a treehouse, this blog has photographs of a hut made from living trees. They look like some kind of ficus to me. If you look at the detail images, you'll see how the trunks have knitted together- those columns you can see are 'woven' from stems.

March 29, 2006
Treehouse, no wait... House tree?
Nevermind a treehouse, this blog has photographs of a hut made from living trees. They look like some kind of ficus to me. If you look at the detail images, you'll see how the trunks have knitted together- those columns you can see are 'woven' from stems.
March 28, 2006
3d Software for Scout Pioneering
 There have been a couple of questions recently about the software I use to make the drawings on this site.
 The 3d program I use is called SketchUp, it is unbelievably fast and pretty simple to use in comparison to other 3d software. Recently, the company was purchased by Google. You can download a trial version here, this will run for 8 hours of use- enough time for you to learn the software and build some fairly detailed models (a typical drawing for this site will take me about 15 to 20 minutes). To get a feel for how it works, watch the video tutorials before opening it up and building a computer model of your own pioneering project...
March 26, 2006
Hebrew-English translator sought
An anonymous message on my Israeli super-pioneering post has given me some very intriguing links, this time with in-depth explanations. Unfortunately, I can't read Hebrew, and can't find a decent on-line translating service. If you speak Hebrew (and especially if you are scout) and have a little time to help me translate these pages, please let me know. Thanks.
Kontiki 2006 - Some Rafts
A Kontiki report back should probably include some reference to the rafts at some point :) These are a couple I snapped while doing water patrol on sunday morning.
 Team 1, First Eagles, with an Acromantula. Legs are made from 2 litre plastic bottles wrapped in black plastic bags.
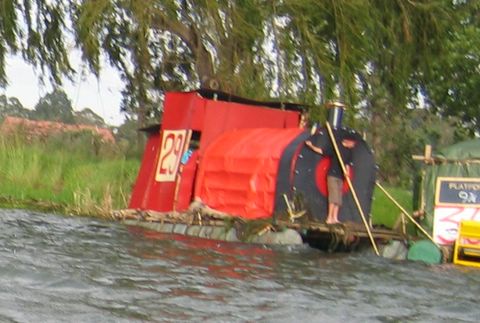 Team 29 (1st Kengray)with a Hogwart's Express train. Nice piece of pioneering work- if you look you can see the laths supporting the decorations on the side.
 Departing from the Harry Potter theme of the other rafts is this Pirates of the Caribbean ship. Raft number is obscured so I can't say who this was, possibly 9th Irene.
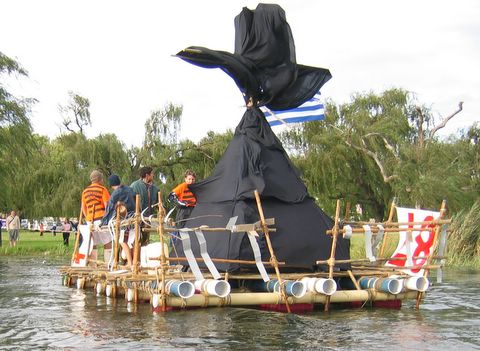
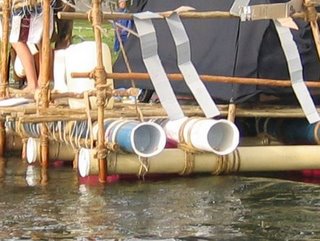 1st Hellenic have hidden their tent inside the sorting hat on this raft, but what I'm really interested in is not the decoration, but the construction material they have chosen: instead of eucalyptus poles, the most common pioneering material in South Africa, they have used PVC drainage pipes- see the detail photo. I imagine there are pretty good weight savings to be made using this material. I'm going to try and find out some more about their success with pipes for pioneering structures... watch this space.
 Team 1, First Eagles, with an Acromantula. Legs are made from 2 litre plastic bottles wrapped in black plastic bags.
 Team 29 (1st Kengray)with a Hogwart's Express train. Nice piece of pioneering work- if you look you can see the laths supporting the decorations on the side.
 Departing from the Harry Potter theme of the other rafts is this Pirates of the Caribbean ship. Raft number is obscured so I can't say who this was, possibly 9th Irene.
 1st Hellenic have hidden their tent inside the sorting hat on this raft, but what I'm really interested in is not the decoration, but the construction material they have chosen: instead of eucalyptus poles, the most common pioneering material in South Africa, they have used PVC drainage pipes- see the detail photo. I imagine there are pretty good weight savings to be made using this material. I'm going to try and find out some more about their success with pipes for pioneering structures... watch this space.
March 23, 2006
Friction-lock table- one-rope pioneering
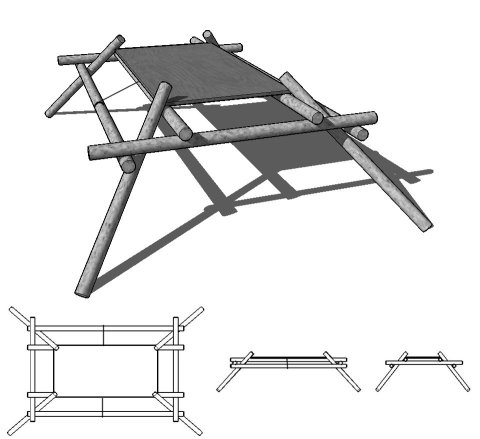 More reporting from Kontiki- Marc spotted this table at Kontiki, which has been built quite ingeniously. Friction locks the whole table together. There is one rope stopping the entire thing from spreading out and falling apart, running across the table (from left to right,under the table top). No lashings are used at all in this construction.
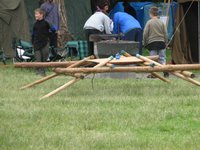 The original table was made (I think) by 1st Greenside scout troop- if you can confirm this or correct it, please leave a comment for me here. From the photo, I am unable to tell whether the legs are splayed out or parallel to each other, in the drawings above I have made them splayed so that they lock the table-top down.
 I imagine that it would be built like this: lay out 4 parallel poles (the ones pointing towards the screen in the drawing and photograph) and tie together (with clove hitches on each pole).
Lift the 2 centre poles you have just tied, place the two cross-poles under these but over the outside poles.
Place table top in centre of table.
Lift table (by the two outside tied poles) and hold up (2 scouts) while the legs are inserted.
Once again, I'd love to hear from the builders of this table, and know how they actually did it.
March 16, 2006
Downloadable pioneering book
 Clarke at Scoutmaster blog has put together a great book with pioneering drawings and explanations that you can download as a PDF here. Based on the requirements for the Boy Scouts of America's pioneering merit badge, it covers all of the basics of general pioneering, and is definitely worth looking at. Take a look at the Knots and Pioneering category on Scoutmaster blog here.
March 13, 2006
Step-By-Step Tensegrity Tower
 This series runs through the theoretical and practical aspects of building a tensegrity tower
Part 1 : Introduction
Part 2 : Drawings and discussion
Part 3 : Building a model
Part 4 : Assembling the full-size tower
Part 5 : Completing and installing the tower
Links
-Wikipedia article on Tensegrity
-Tensegrity website with photographs and links
-Shelter systems, a company making tensegrity tents.
-Tensegrity model built for Burning Man.
-Tensegrity shade tent, also built for Burning Man.
-Kenneth Snelson's homepage (Snelson invented tensegrity structures)
-Wikipedia article on Kenneth Snelson
-Tensegrity cube kit (sponsored Amazon link)
Step-By-Step Tensegrity Tower part 5
< PREVIOUS MAIN
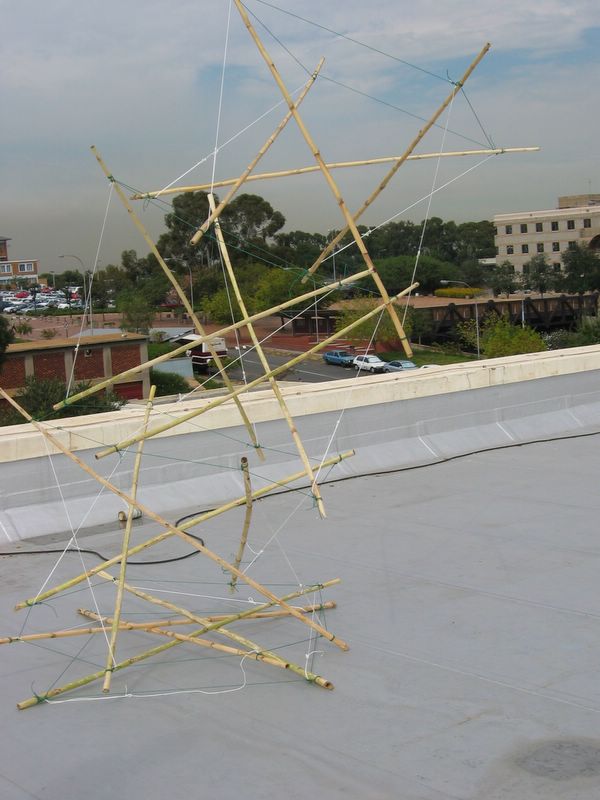
 The final step in setting up the tensegrity tower is in adjusting the diagonal cables to level the structure and make it symmetrical. After the previous post, your tower should look something like the tensegrity above, but will probably not be very tidy- there might be poles touching each other, the lower deck is probably squashed under the weight of the decks above. Again, working methodically around the structure from bottom to top and in the same direction on each deck, tighten the diagonal ropes. You will quickly get an idea for how they interact with each other. Don't be scared to tighten the lower decks by quite a lot to get the tower standing straight. When the tower is leaning in one direction (like this one is: in fact just outside the photo Ross is holding a string to stop this from falling over)
 This is a close-up showing how the bottom deck has collapsed, with all poles touching at least one other pole. Tightening the diagonals will fix this. Ideally, you can tighten the diagonals on opposite sides at the same time- if two people work on the tower, this is pretty easy.
 Another kind of failure that can happen if you are not careful is that the mounting loops at the ends of the poles can come untied- what normally happens is that your structure will either collapse completely or you will end up with a rope running up onto one of the other ropes- like this one has. Loosen the diagonal and carefully re-tie the loop.
After a couple of passes around the structure, you should be happy with the symmetry. All that is left now is to place your tower where you want it. There is a little trick here: if you CAREFULLY untie one diagonal in each layer, you can actually bundle your tensegrity up into a small roll like this:

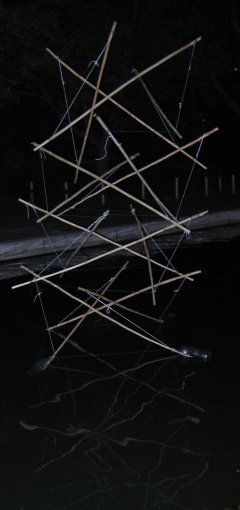
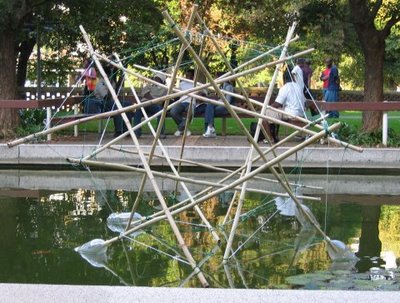
Which is exactly what we did, so that we could set it up in the pond.
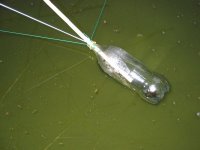 We decided that because the tensegrity tower is so light, we wanted to float it in the pond outside the Architecture building. To do this, we simply placed a 2 litre soft drink bottle onto each leg of the bottom deck, as shown in this photo. We then tied the one leg of the tower to the pipe for the water fountain in the pond, so that it would not float to the edges of the pond. And that's that!
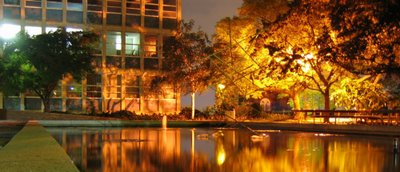
The tower the night we installed it.
After a few weeks, the cane started to buckle, and the tower would no longer stand. We laid it on it's side and moved the bottles around to turn it into a 'bridge' (By the way, you ca nget a clue for the weight of the structure: 4 2 litre bottles will float at most an 8 kilogram structure, so this tower must have been lighter than that).
NEXT: review of all the tensegrity posts, links to sites, other examples.

 The final step in setting up the tensegrity tower is in adjusting the diagonal cables to level the structure and make it symmetrical. After the previous post, your tower should look something like the tensegrity above, but will probably not be very tidy- there might be poles touching each other, the lower deck is probably squashed under the weight of the decks above. Again, working methodically around the structure from bottom to top and in the same direction on each deck, tighten the diagonal ropes. You will quickly get an idea for how they interact with each other. Don't be scared to tighten the lower decks by quite a lot to get the tower standing straight. When the tower is leaning in one direction (like this one is: in fact just outside the photo Ross is holding a string to stop this from falling over)
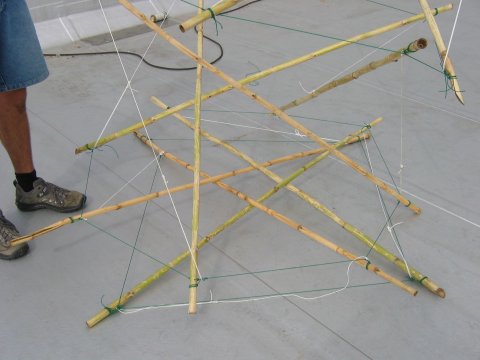 This is a close-up showing how the bottom deck has collapsed, with all poles touching at least one other pole. Tightening the diagonals will fix this. Ideally, you can tighten the diagonals on opposite sides at the same time- if two people work on the tower, this is pretty easy.
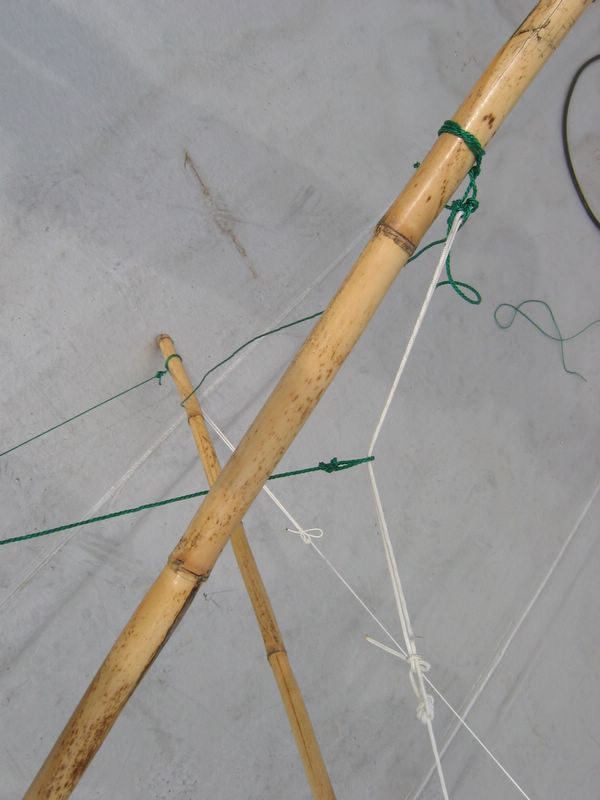 Another kind of failure that can happen if you are not careful is that the mounting loops at the ends of the poles can come untied- what normally happens is that your structure will either collapse completely or you will end up with a rope running up onto one of the other ropes- like this one has. Loosen the diagonal and carefully re-tie the loop.
After a couple of passes around the structure, you should be happy with the symmetry. All that is left now is to place your tower where you want it. There is a little trick here: if you CAREFULLY untie one diagonal in each layer, you can actually bundle your tensegrity up into a small roll like this:
Which is exactly what we did, so that we could set it up in the pond.
 We decided that because the tensegrity tower is so light, we wanted to float it in the pond outside the Architecture building. To do this, we simply placed a 2 litre soft drink bottle onto each leg of the bottom deck, as shown in this photo. We then tied the one leg of the tower to the pipe for the water fountain in the pond, so that it would not float to the edges of the pond. And that's that!
The tower the night we installed it.

After a few weeks, the cane started to buckle, and the tower would no longer stand. We laid it on it's side and moved the bottles around to turn it into a 'bridge' (By the way, you ca nget a clue for the weight of the structure: 4 2 litre bottles will float at most an 8 kilogram structure, so this tower must have been lighter than that).
NEXT: review of all the tensegrity posts, links to sites, other examples.
Step-By-Step Tensegrity Tower part 4
< PREVIOUS MAIN NEXT>
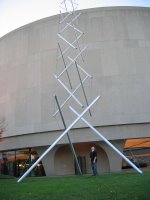
 This post describes the building of the full-scale tensegrity tower. Ross Esselen and I built this in April 2004 at Wits University as a diversion from our studies.
Like the model in the previous post, the ratio of length between the ropes and the poles was 1:1.414. Materials used: 16 cane sticks (harvested from a campsite) and a 20m roll of lacing cord (nylon hawser-laid twine). Also cut yourself a spacer that is the length of your cord members, so that you can use this to measure your structure as you build.
 The staves need to be prepared by cutting all to similar length and marking out the points where the ropes will be attached using a marker (or a knife). The point where the ropes will be attached needs to be prepared by fitting a 'loop' that the 3 ropes can easily be tied to. The loop is attached to the pole using a constrictor, and the loop itself is made by joining the two ends with a sheetbend.
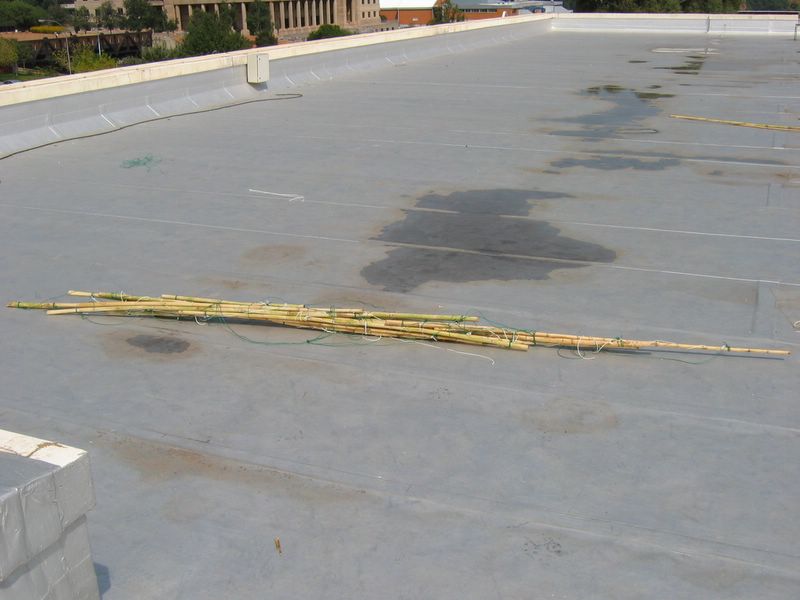
 Once the poles are prepared for use, lay them out in the grid, ready to tie the rope on, like the image on the left. If you can work on a flat, clean surface like the rooftop I have used here, that will make construction easiest. At Kontiki, building on long grass made this task much more difficult.
 Remember that the the very bottom and very top layers of horizontal cables will only be tied to 4 poles, each 1 unit away from the next. All other layers will be tied to 8 poles, which are spaced 1/2 unit apart. Remember to cut lengths of cord slightly longer than one unit, so that you can tie them on to the loops of each pole.Work systematically, from bottom to top, starting at the same end for every level, and work through tying the horizontal cables together. At this point remember also that you should be leaving one cord tied to only one pole at the edge of the structure so that when you 'roll it up' later you have the cord ready to tie.
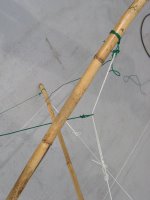
 The diagonal cables need to be attached now. Remember that a diagonal links the bottom of one pole to the top of the next pole IN THE SAME LAYER. Also, remember that the layers lie in alternate directions (poles will lean one way in one layer and the opposite way in the next one, see the layout photos above or review this post). The 1-unit long spacer is now used to check that the length is right.
 We are aiming for a length of one unit here, the same as the horizontal cables, BUT we want to be able to adjust these so that we can level the structure out. Use a trucker's hitch as pictured on the left, to be able to adjust these later. Click through on the link to see how it is tied. Again, one end is tied to the top of a pole, and the other end to the bottom of the next one- I found it easiest to anchor the cord to the top end with a round turn and two half-hitches and tie the trucker's hitch at the bottom.

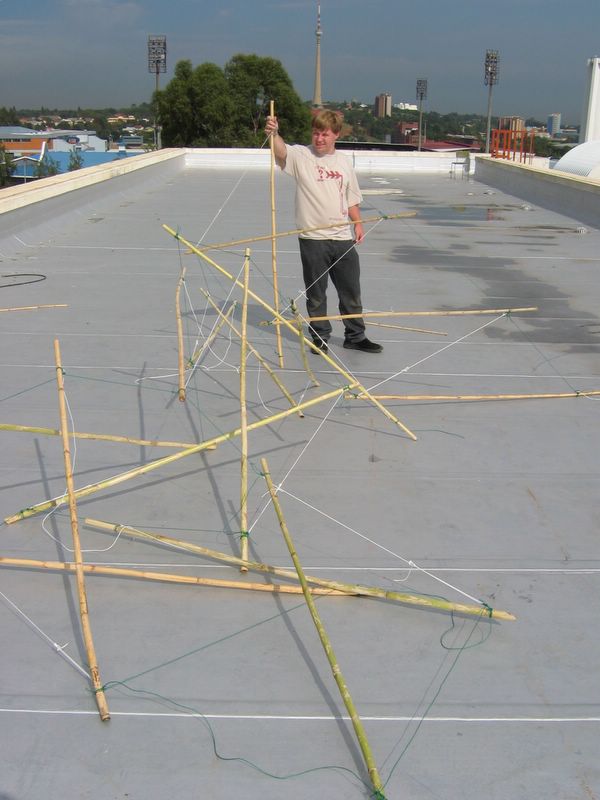
All of the ropes that can be tied 'in the flat' have been tied, and your tower should like the one in the photo above. You are now ready to start 'rolling up' the tower. As before, the key here is to start at one end and work systematically to the other.
 Tie all of the 'horizontal' cords first, remembering to measure that they are the correct length. Once they are tied, you will have the structure in the stage it is in on the left. Now work throught from bottom to top again, tying the final diagonal for each level. This is when the tower will start popping into shape, and strange things will happen- at times the structure looks almost as if it's alive- twisting and jumping as you tighten these chords. Measure them approximately and lock all the diagonal off with a slipped half-hitch so that you can easily adjust them later. Your 'tower' is now almost ready, before you stand it up for the first time, check that it looks roughly like this:

Next post: adjusting, levelling and placing the tensegrity tower.
 This post describes the building of the full-scale tensegrity tower. Ross Esselen and I built this in April 2004 at Wits University as a diversion from our studies.
Like the model in the previous post, the ratio of length between the ropes and the poles was 1:1.414. Materials used: 16 cane sticks (harvested from a campsite) and a 20m roll of lacing cord (nylon hawser-laid twine). Also cut yourself a spacer that is the length of your cord members, so that you can use this to measure your structure as you build.
 The staves need to be prepared by cutting all to similar length and marking out the points where the ropes will be attached using a marker (or a knife). The point where the ropes will be attached needs to be prepared by fitting a 'loop' that the 3 ropes can easily be tied to. The loop is attached to the pole using a constrictor, and the loop itself is made by joining the two ends with a sheetbend.
 Once the poles are prepared for use, lay them out in the grid, ready to tie the rope on, like the image on the left. If you can work on a flat, clean surface like the rooftop I have used here, that will make construction easiest. At Kontiki, building on long grass made this task much more difficult.
 Remember that the the very bottom and very top layers of horizontal cables will only be tied to 4 poles, each 1 unit away from the next. All other layers will be tied to 8 poles, which are spaced 1/2 unit apart. Remember to cut lengths of cord slightly longer than one unit, so that you can tie them on to the loops of each pole.Work systematically, from bottom to top, starting at the same end for every level, and work through tying the horizontal cables together. At this point remember also that you should be leaving one cord tied to only one pole at the edge of the structure so that when you 'roll it up' later you have the cord ready to tie.
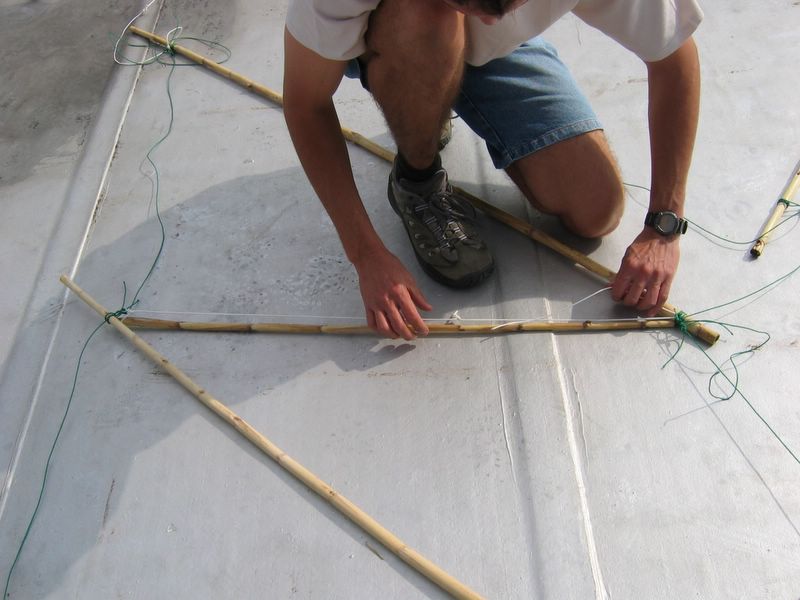 The diagonal cables need to be attached now. Remember that a diagonal links the bottom of one pole to the top of the next pole IN THE SAME LAYER. Also, remember that the layers lie in alternate directions (poles will lean one way in one layer and the opposite way in the next one, see the layout photos above or review this post). The 1-unit long spacer is now used to check that the length is right.
 We are aiming for a length of one unit here, the same as the horizontal cables, BUT we want to be able to adjust these so that we can level the structure out. Use a trucker's hitch as pictured on the left, to be able to adjust these later. Click through on the link to see how it is tied. Again, one end is tied to the top of a pole, and the other end to the bottom of the next one- I found it easiest to anchor the cord to the top end with a round turn and two half-hitches and tie the trucker's hitch at the bottom.

All of the ropes that can be tied 'in the flat' have been tied, and your tower should like the one in the photo above. You are now ready to start 'rolling up' the tower. As before, the key here is to start at one end and work systematically to the other.
 Tie all of the 'horizontal' cords first, remembering to measure that they are the correct length. Once they are tied, you will have the structure in the stage it is in on the left. Now work throught from bottom to top again, tying the final diagonal for each level. This is when the tower will start popping into shape, and strange things will happen- at times the structure looks almost as if it's alive- twisting and jumping as you tighten these chords. Measure them approximately and lock all the diagonal off with a slipped half-hitch so that you can easily adjust them later. Your 'tower' is now almost ready, before you stand it up for the first time, check that it looks roughly like this:
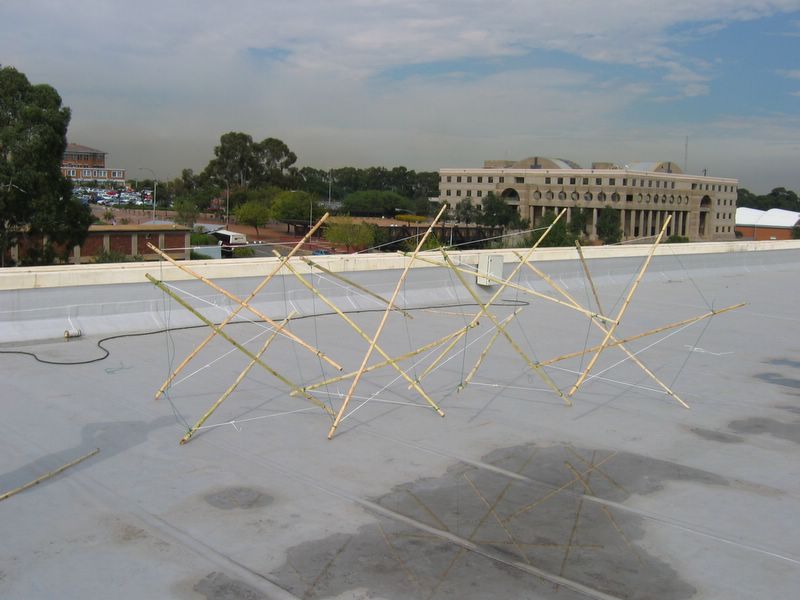
Next post: adjusting, levelling and placing the tensegrity tower.
Step-By-Step Tensegrity Tower part 3
< PREVIOUS MAIN NEXT>
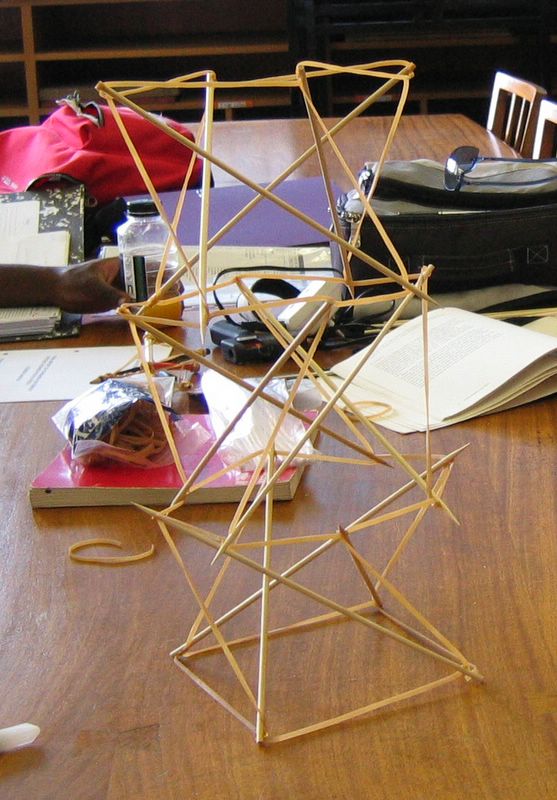
 Having looked at the drawings, the next step is to build a model from skewers and elastic bands, to better understand how the structure works and to get precise measurements. We will estimate dimensions and use the model to adjust our measurements, then scale them up to build the full size tower.
Before you can start building, you will need some skewers and some elastic bands cut to make long strips of elastic. You will also need superglue (cyanoacrylate adhesive)- this is the fastest and easiest way to glue the elastic bands to the skewers. Set aside an hour to do this from start to finish the first time you do it. Once you have practiced, it should take about half an hour to build a model like this.
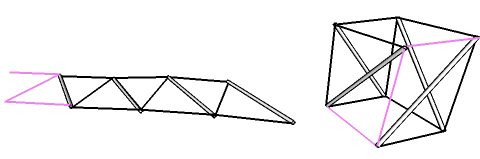
 The idea with this type of tensegrity is to always make the structure lying flat or unrolled like the drawing at left, and then to attach all the pieces together to raise it into shape at the end.
 This photograph shows two levels of the structure, attached together and ready to be 'rolled up' into shape as a tower. There are two things to notice about this structure: the two levels are sloping in opposite directions, and the two levels are joined without the skewers touching. The upper deck's skewers all touch the middle layer of elastics halfway between the bottom deck's skewers. One last thing here is the proportion of the structure: if the elastic is 1 unit long, then the skewer is roughly 1.5 (actually 1.414...-the square root of two) units long. I chose this dimension for the sake of simplicity, and it seems to work fairly well. You might be thinking "how is 1.414 simple?" If you look at the image, you will see that the elastic bands lie roughly at right angles to each other. That is because of the proportions of 1: 1.414ish. The elastics were all cut to the exact same lenght as each other, and the skewers were then marked with a permanent marker at the 2 points where the elastics were to be attached. 1 drop of superglue on the end of the elastic, place the skewer on, and in a few seconds the glue has cured (as always with cyanoacrylate, be careful about sticking your fingers to the model).
 Once you are finished with the grid and are ready to roll your model up, seperate out the elastics that are going to run horizontally (ie. the blue,turquoise or green ones from this drawing) from the diagonal (or red) ones. Glue the horizontal elastics first, starting at the bottom and working your way up to the top. When you are finished with this, you will bave a very dis-ordered looking bundle of elastic and skewers. The most confusing step is coming. You need to work methodically from the bottom up, attaching the diagonal elastics. The thing to watch out for here is that you work within one level all the time- don't attach an elastic from the first level to a skewer on the second level. Diagonal elastics should only be joining the bottom of a skewer to the top of a skewer on the same level.
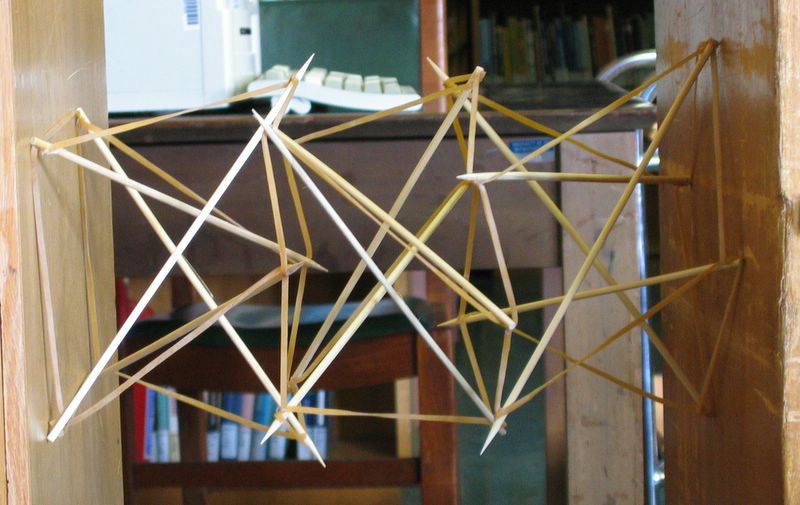
 The completed model,squashed between two cupboards. The handy thing about using elastic bands is that they will just stretch to adjust the structure to the best shape. So instead of a tower, this is more of a bridge, and we can simply neasure off with a ruler and scale the dimensions up for a larger structure.
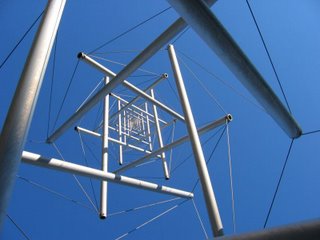
 A final shot, looking down into the model, showing how the structure is arranged. The next post will look at the actual full-scale structure, built with bamboo and nylon, which was set afloat on the pond in front of the architecture department at Wits university for 2 weeks.
 Having looked at the drawings, the next step is to build a model from skewers and elastic bands, to better understand how the structure works and to get precise measurements. We will estimate dimensions and use the model to adjust our measurements, then scale them up to build the full size tower.
Before you can start building, you will need some skewers and some elastic bands cut to make long strips of elastic. You will also need superglue (cyanoacrylate adhesive)- this is the fastest and easiest way to glue the elastic bands to the skewers. Set aside an hour to do this from start to finish the first time you do it. Once you have practiced, it should take about half an hour to build a model like this.
 The idea with this type of tensegrity is to always make the structure lying flat or unrolled like the drawing at left, and then to attach all the pieces together to raise it into shape at the end.
 This photograph shows two levels of the structure, attached together and ready to be 'rolled up' into shape as a tower. There are two things to notice about this structure: the two levels are sloping in opposite directions, and the two levels are joined without the skewers touching. The upper deck's skewers all touch the middle layer of elastics halfway between the bottom deck's skewers. One last thing here is the proportion of the structure: if the elastic is 1 unit long, then the skewer is roughly 1.5 (actually 1.414...-the square root of two) units long. I chose this dimension for the sake of simplicity, and it seems to work fairly well. You might be thinking "how is 1.414 simple?" If you look at the image, you will see that the elastic bands lie roughly at right angles to each other. That is because of the proportions of 1: 1.414ish. The elastics were all cut to the exact same lenght as each other, and the skewers were then marked with a permanent marker at the 2 points where the elastics were to be attached. 1 drop of superglue on the end of the elastic, place the skewer on, and in a few seconds the glue has cured (as always with cyanoacrylate, be careful about sticking your fingers to the model).
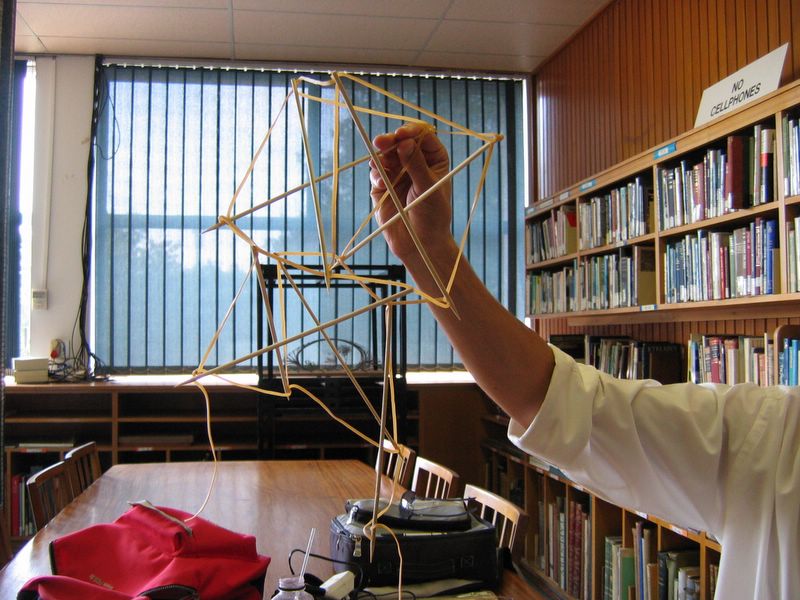 Once you are finished with the grid and are ready to roll your model up, seperate out the elastics that are going to run horizontally (ie. the blue,turquoise or green ones from this drawing) from the diagonal (or red) ones. Glue the horizontal elastics first, starting at the bottom and working your way up to the top. When you are finished with this, you will bave a very dis-ordered looking bundle of elastic and skewers. The most confusing step is coming. You need to work methodically from the bottom up, attaching the diagonal elastics. The thing to watch out for here is that you work within one level all the time- don't attach an elastic from the first level to a skewer on the second level. Diagonal elastics should only be joining the bottom of a skewer to the top of a skewer on the same level.
 The completed model,squashed between two cupboards. The handy thing about using elastic bands is that they will just stretch to adjust the structure to the best shape. So instead of a tower, this is more of a bridge, and we can simply neasure off with a ruler and scale the dimensions up for a larger structure.
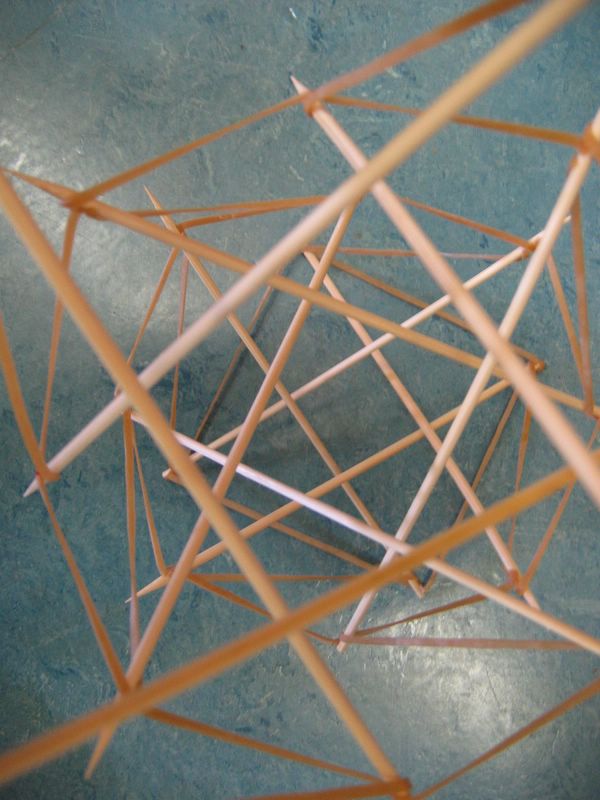 A final shot, looking down into the model, showing how the structure is arranged. The next post will look at the actual full-scale structure, built with bamboo and nylon, which was set afloat on the pond in front of the architecture department at Wits university for 2 weeks.
March 11, 2006
Step-By-Step Tensegrity Tower part 2
< PREVIOUS MAIN NEXT>
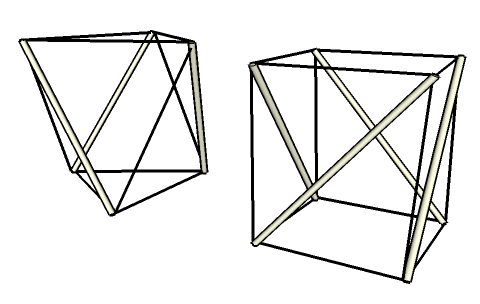
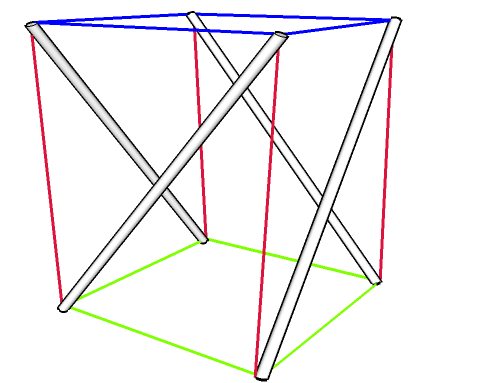
The type of tensegrity we are building is a tower that is made from a series of simple tensegrity units stacked on top of each other. Unlike the flagpole and the Needle Point Tower in this post which have 3 compression members per level, the tower I have photographed for the tutorial has 4 compression members on each level. The drawing above shows the unit for each tower.
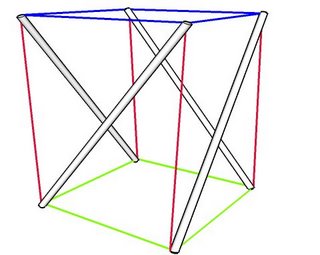 Let's look at the unit for now to try and understand a little better how the system works. There are 3 sets of cables- connecting the bottoms of poles together (green), connecting the tops of poles together (blue), and connecting bottoms to tops (red). Every end of every pole has 3 cables tied to it- one that is connecting it to the opposite end of another pole and 2 that are both connecting it to the same end of other poles. When you start building the tower, you need to remember this property otherwise things can get pretty confusing.
 To build one of these units, the simplest thing to do is to lay the 4 poles out flat, and then tie 3 of them together, measuring carefully (more about measurements in the next post), leaving the 4th set of connections to be tied later. This gives you the flat layout on the left of this drawing. Once you start tying the fourth set of cables (purple in this photo), your unit will start standing up and taking shape.
 The actual tower is made by connecting a whole series of these units together vertically, so that the ring of cables at the bottom of one unit is also the ring of cables connecting the top of the unit below it (ie, so that the blue cables for one unit are also the green cables for another). You can see that we now have a green base, a series of turquoise base/top layers, and a blue top. The red cables continue as they would normally. It's also important to notice that the direction of 'twist' in each layer changes- one goes clockwise, the next anti-clockwise, the next clockwise again etc. This is so that the seam of the tower runs in straight line up the side, which makes life MUCH easier when it comes to assembling and putting up the full size tower. The next post will look at building an elastic band model, before moving on to the full-size tower.

The type of tensegrity we are building is a tower that is made from a series of simple tensegrity units stacked on top of each other. Unlike the flagpole and the Needle Point Tower in this post which have 3 compression members per level, the tower I have photographed for the tutorial has 4 compression members on each level. The drawing above shows the unit for each tower.
 Let's look at the unit for now to try and understand a little better how the system works. There are 3 sets of cables- connecting the bottoms of poles together (green), connecting the tops of poles together (blue), and connecting bottoms to tops (red). Every end of every pole has 3 cables tied to it- one that is connecting it to the opposite end of another pole and 2 that are both connecting it to the same end of other poles. When you start building the tower, you need to remember this property otherwise things can get pretty confusing.To build one of these units, the simplest thing to do is to lay the 4 poles out flat, and then tie 3 of them together, measuring carefully (more about measurements in the next post), leaving the 4th set of connections to be tied later. This gives you the flat layout on the left of this drawing. Once you start tying the fourth set of cables (purple in this photo), your unit will start standing up and taking shape.
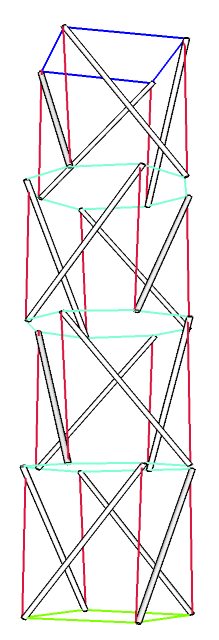 The actual tower is made by connecting a whole series of these units together vertically, so that the ring of cables at the bottom of one unit is also the ring of cables connecting the top of the unit below it (ie, so that the blue cables for one unit are also the green cables for another). You can see that we now have a green base, a series of turquoise base/top layers, and a blue top. The red cables continue as they would normally. It's also important to notice that the direction of 'twist' in each layer changes- one goes clockwise, the next anti-clockwise, the next clockwise again etc. This is so that the seam of the tower runs in straight line up the side, which makes life MUCH easier when it comes to assembling and putting up the full size tower. The next post will look at building an elastic band model, before moving on to the full-size tower.
Step-By-Step Tensegrity Tower part 1
MAIN NEXT>
 Tensegrities are a type of structural system where all of the compression members (poles/columns) are supported and connected to each other with tensions members (ropes). This means that the poles look as if they are floating in a mass of cables.
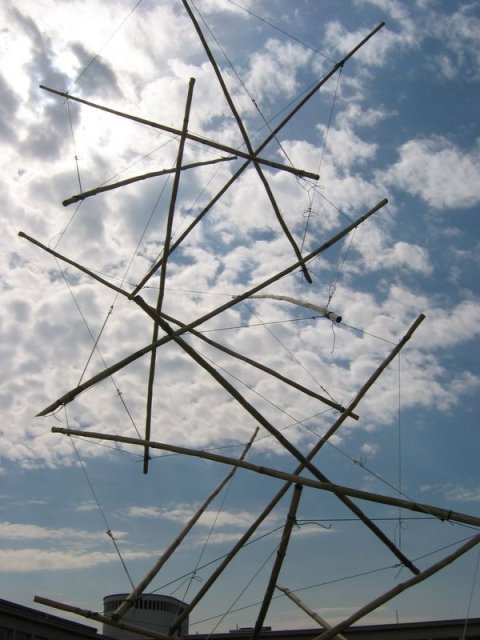
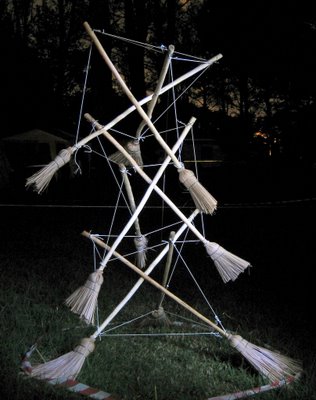
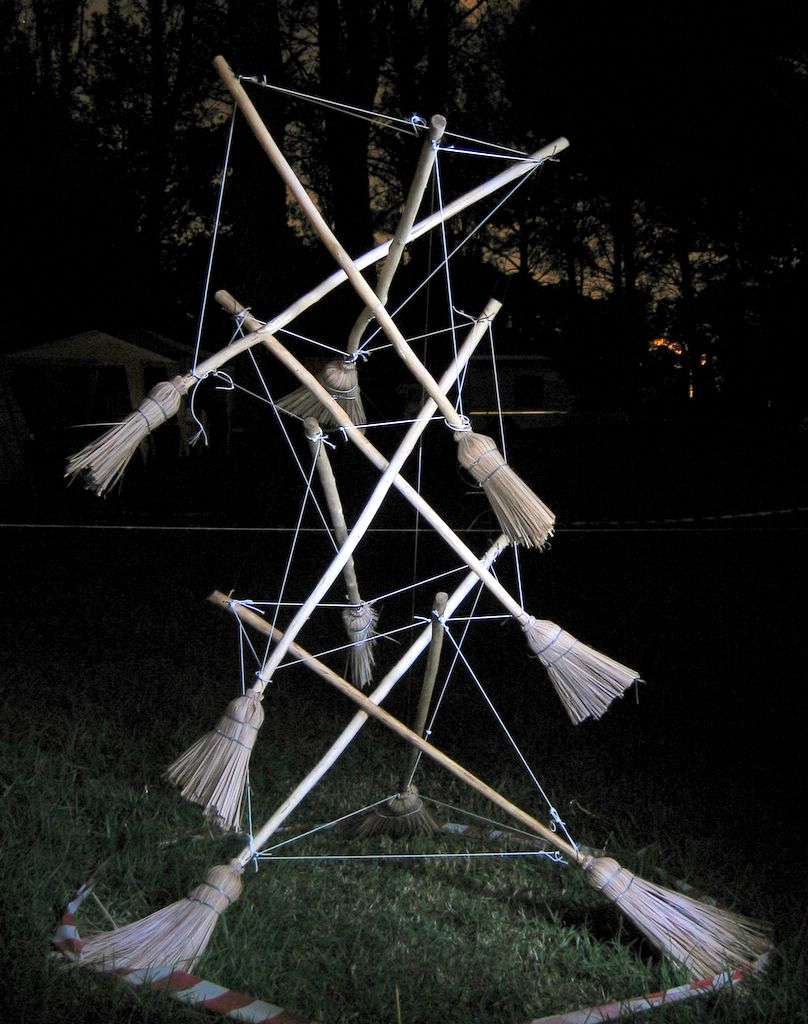
As promised, I am going to explain step-by-step how to build a tensegrity tower similar to the flagpole I made at Kontiki this year (shown here with the flag removed so that the structure is visible).
Tensegrity structures (the name means tension-integrity, because the tension cables are what makes the structure stand up) were invented by an American artist called Kenneth Snelson, who has made many tensegrity sculptures. R. Buckminster Fuller, an American inventor and engineer, named the structures after seeing sculptures Snelson had made.
Although they might look confusing, these structures are really very simple, and all that is needed is to be methodical when building them. I recommend building a model first, and this step by step guide will follow that format: a model, then a full-scale tower, and lastly links to some books and websites (and one or two other things).
Lastly, here are some photos of Kenneth Snelson's 1968 Needle Point Tower tensegrity sculpture at the Hirshorn Museum in Washington, D.C.
 Tensegrities are a type of structural system where all of the compression members (poles/columns) are supported and connected to each other with tensions members (ropes). This means that the poles look as if they are floating in a mass of cables.
As promised, I am going to explain step-by-step how to build a tensegrity tower similar to the flagpole I made at Kontiki this year (shown here with the flag removed so that the structure is visible).
Tensegrity structures (the name means tension-integrity, because the tension cables are what makes the structure stand up) were invented by an American artist called Kenneth Snelson, who has made many tensegrity sculptures. R. Buckminster Fuller, an American inventor and engineer, named the structures after seeing sculptures Snelson had made.
Although they might look confusing, these structures are really very simple, and all that is needed is to be methodical when building them. I recommend building a model first, and this step by step guide will follow that format: a model, then a full-scale tower, and lastly links to some books and websites (and one or two other things).
Lastly, here are some photos of Kenneth Snelson's 1968 Needle Point Tower tensegrity sculpture at the Hirshorn Museum in Washington, D.C.


March 6, 2006
Get latest updates from Ropes and Poles
Just a reminder that you can keep up to date with new material on this site as it is posted, by signing up for e-mail updates or getting the RSS live feed.
Kontiki 2006: team 7 photographs
Gauteng Kontiki took place over the weekend- around 3000 scouts, guides and supporters camped at Murray Park and 66 rafts participated in the weekend. Congratulations to this years winners, 3rd Krugersdorp Guides, who are the first Guide group to win Kontiki. I have put together photographs of my troop, and will post other photographs over the next few days. The theme for 2006 was 'an enchanted journey'. Our troop (as well as quite a few other) chose a Harry Potter slant on this, which will be apparent in the photographs below.
Kontiki is divided into 2 competitions: raft and supporters. Supporters consists of the campsite, competiton meal, play acting and spare time activities (ie. everything except for the raft). Raft competition includes technical and safety aspects of the raft as well as decorations appropriate to a theme.
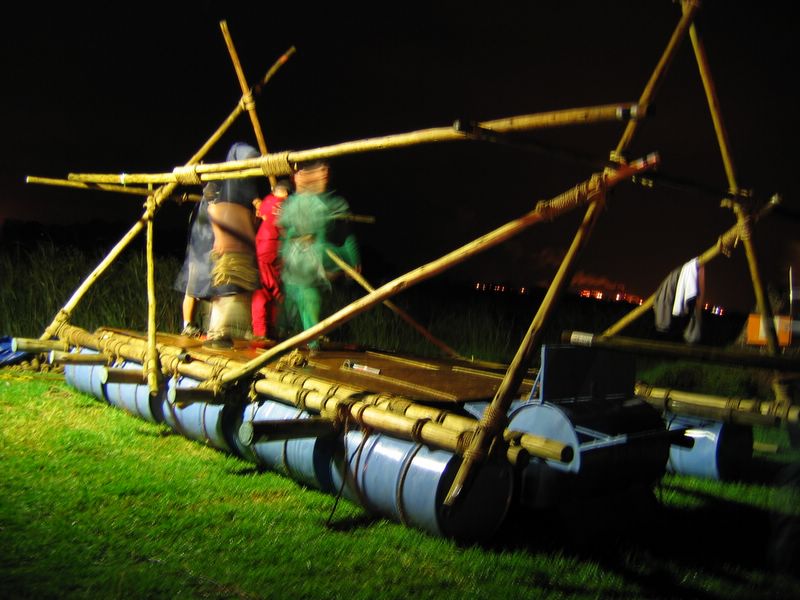
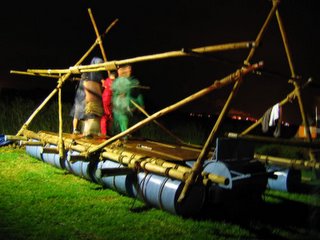 This is a photograph of our raft under construction on Friday night. The A-frame construction is a descendant of the pontoon ferry raft which we have been using for some time- the structure is trinagulated, and because of this is very stable. Decking has been attached, barrels tied on and you can see how a secondary superstructure frame has been added to hang the decorations. During the construction of the raft, it rained fairly hard, but our scouts had a tarpaulin under which all our ropes were stored, which made construction much easier as all ropes were dry.
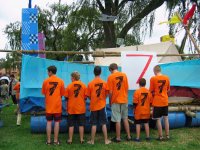 The raft was decorated as a Quidditch pitch, complete with corner towers, a quidditch player flying on a broom (visible on the top rope in this photograph), hoops (tied to the running lights and not visible in this photograph) and a golden snitch. The raft crew are shown here modelling the t-shirts with our team number and a quidditch player. Rafts launch at 12 on Saturday (rafts are launched by picking them up and carrying them into the water (this takes about 20 people) and come off the water 24 hours later.
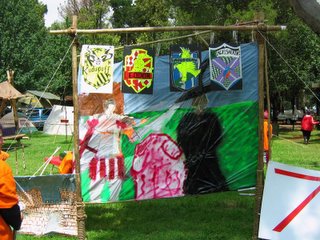 The gateway to our campsite was a portrait as in the Harry Potter books- with a password needed to open the gate. The entire portrait opens like a door, using frapping mallets as hinges. Above the door you can see badges of the four houses of Hogwarts School, modified to match our four patrols. The idea for this gateway came from a troop brainstorming session, and the design was resolved by Alastair Cooper, who also designed the porcullis gateway.
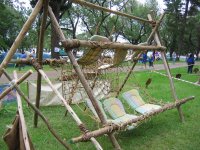 Our camp couch this year was upgraded- to include 2 seating levels, and was reinforced as well- using cargo nets instead of sack cloth for the seats. This was a favourite of our scouts, with the upper level offering a view of the waterfront and some of the rafts, and the lower level facing in towards our camp site. The ladder leading to the upper level is visible behind the couch in this photograph.
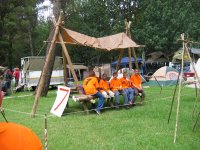 Our dining table is a fairly straighforward table, with a tripod at either end supporting the deck of the table and a bench running along either side. There is also a shelter (2006 did not disappoint, with a storm on Friday night- making 20 out of 22 Kontiki weekends that have had rain) as well as a wire chandelier made by a craftsman working on the side of the road (who worked from a photograph of a crystal chandelier).
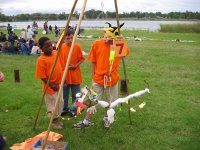
 The only campsite gadget not designed and built by the scouts themselves was the flagpole, where I tried out a rather unusual structure. This type of tower is called a tensgrity system, and none of the brooms in this model are touching each other- they are all supported by a network of cables. In this photograph I am still adjusting the cables to level the tower out. In the next few days I will post a step-by-step guide to building a tower like this, with photographs of every stage and links to other tensegrity structures on the net.
Outside of my normal subject matter of pioneering, are a few other aspects of the supporter's competition:
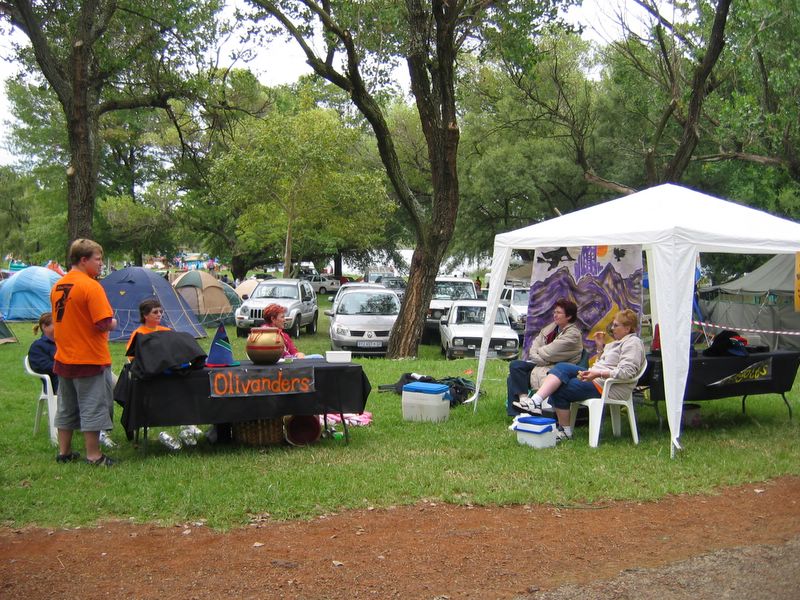
 Firstly, the Beaver Challenge. This is a challenge activity for Cubs and younger Scouts (Brownies and younger Guides as well, of course), which involves moving between a number of bases completing activities, and having a card stamped, with the aim of filling the card with stamps and earning a badge. Our pack scouters run our Beaver Challenge base, and this year consisted of choosing a 'bank vault'to open (one of a grid of matchboxes) from which the participant took the money and moved across to Ollivander's to buy a magic wand based on the 'money' they had found in the bank vault. Roughly 300 magic wands were distributed.
 The competition meal was cooked by two of our scouts, and was a 'banquet' complete with a bacon,orange and cheese starter, sausages or chicken as the main course and a chocolate dessert. Menu, budget, table setting, grace, hygiene as well as the 3 courses themselves are judged in this competition. The meal was carried on a table suspended from a 'flying broomstick' frame, and our meal placed 2nd overall.
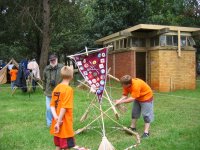
 The Spare Time Activity has become our main parent involvement item at Kontiki- 4 or 5 families as well as all of the scouts on the supporters crew were involved in putting it together. The STA this year consisted of 3 seperate activities (a 'magical circle' made of clothes, as large as possible; a magical creature; and an awareness poster for the Troll Anti-Taunting League). Here is a photograph of our magical creature, which was a working, walking marionette, with a trunk that squirts yellow paralysing poising (also operated from the puppet controls) via a drip spliced into the trunk. Our STA placed 2nd.
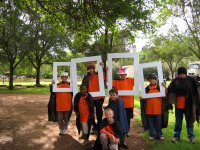 The fancy dress was planned and co-ordinated by our scouts, and consisted of a series of portraits talking to each other, 3 wizards and an appearance by Hagrid (extreme right of photograph).
Other photographs of our troop and our sister troop are available here - thanks to Marc for these photographs. Look out for updates over the coming days, including gateways, rafts and the tensegrity flagpole I mentioned above.
Kontiki is divided into 2 competitions: raft and supporters. Supporters consists of the campsite, competiton meal, play acting and spare time activities (ie. everything except for the raft). Raft competition includes technical and safety aspects of the raft as well as decorations appropriate to a theme.
 This is a photograph of our raft under construction on Friday night. The A-frame construction is a descendant of the pontoon ferry raft which we have been using for some time- the structure is trinagulated, and because of this is very stable. Decking has been attached, barrels tied on and you can see how a secondary superstructure frame has been added to hang the decorations. During the construction of the raft, it rained fairly hard, but our scouts had a tarpaulin under which all our ropes were stored, which made construction much easier as all ropes were dry.
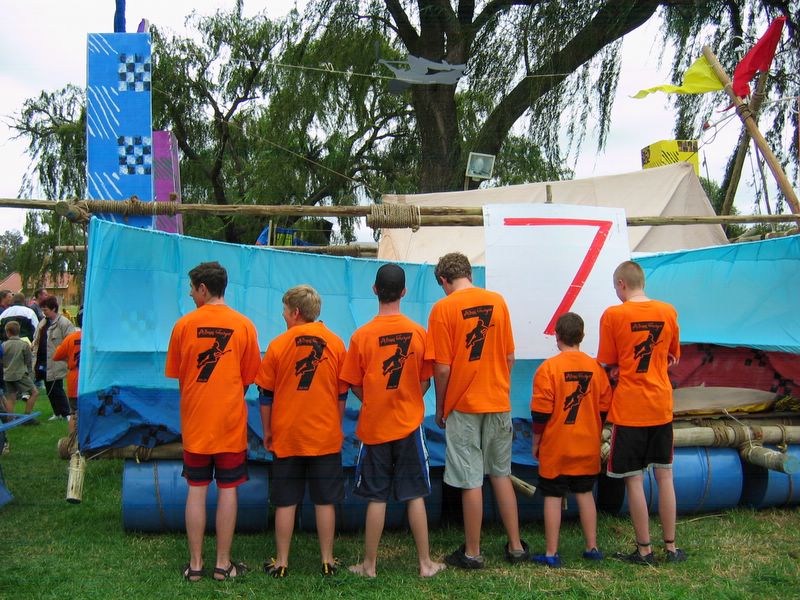 The raft was decorated as a Quidditch pitch, complete with corner towers, a quidditch player flying on a broom (visible on the top rope in this photograph), hoops (tied to the running lights and not visible in this photograph) and a golden snitch. The raft crew are shown here modelling the t-shirts with our team number and a quidditch player. Rafts launch at 12 on Saturday (rafts are launched by picking them up and carrying them into the water (this takes about 20 people) and come off the water 24 hours later.
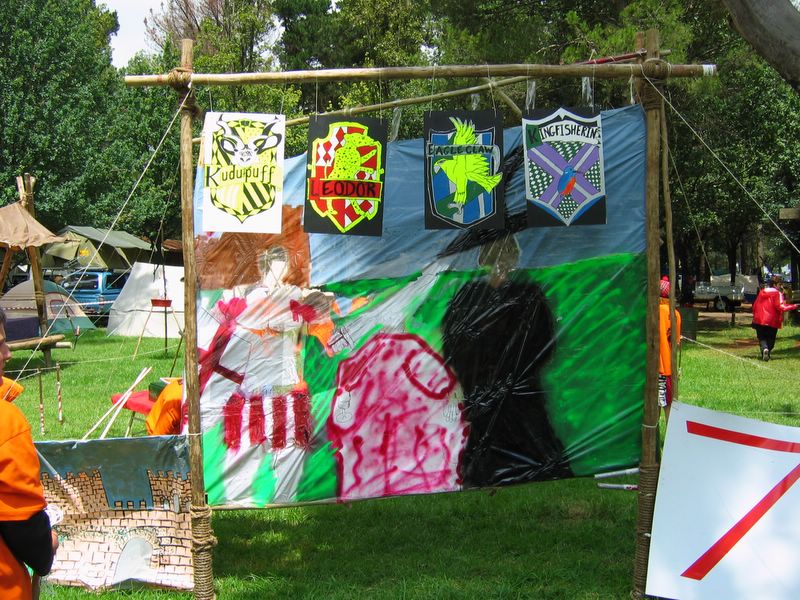 The gateway to our campsite was a portrait as in the Harry Potter books- with a password needed to open the gate. The entire portrait opens like a door, using frapping mallets as hinges. Above the door you can see badges of the four houses of Hogwarts School, modified to match our four patrols. The idea for this gateway came from a troop brainstorming session, and the design was resolved by Alastair Cooper, who also designed the porcullis gateway.
 Our camp couch this year was upgraded- to include 2 seating levels, and was reinforced as well- using cargo nets instead of sack cloth for the seats. This was a favourite of our scouts, with the upper level offering a view of the waterfront and some of the rafts, and the lower level facing in towards our camp site. The ladder leading to the upper level is visible behind the couch in this photograph.
 Our dining table is a fairly straighforward table, with a tripod at either end supporting the deck of the table and a bench running along either side. There is also a shelter (2006 did not disappoint, with a storm on Friday night- making 20 out of 22 Kontiki weekends that have had rain) as well as a wire chandelier made by a craftsman working on the side of the road (who worked from a photograph of a crystal chandelier).
 The only campsite gadget not designed and built by the scouts themselves was the flagpole, where I tried out a rather unusual structure. This type of tower is called a tensgrity system, and none of the brooms in this model are touching each other- they are all supported by a network of cables. In this photograph I am still adjusting the cables to level the tower out. In the next few days I will post a step-by-step guide to building a tower like this, with photographs of every stage and links to other tensegrity structures on the net.
Outside of my normal subject matter of pioneering, are a few other aspects of the supporter's competition:
 Firstly, the Beaver Challenge. This is a challenge activity for Cubs and younger Scouts (Brownies and younger Guides as well, of course), which involves moving between a number of bases completing activities, and having a card stamped, with the aim of filling the card with stamps and earning a badge. Our pack scouters run our Beaver Challenge base, and this year consisted of choosing a 'bank vault'to open (one of a grid of matchboxes) from which the participant took the money and moved across to Ollivander's to buy a magic wand based on the 'money' they had found in the bank vault. Roughly 300 magic wands were distributed.
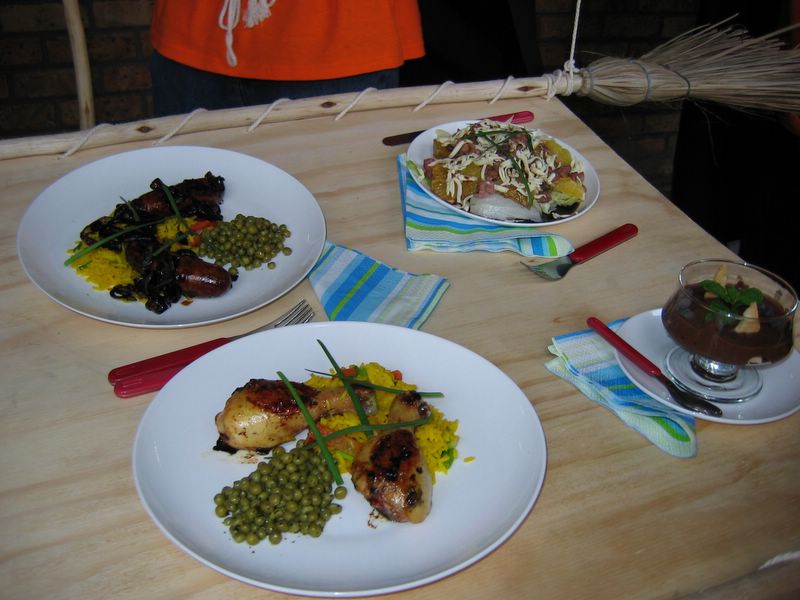 The competition meal was cooked by two of our scouts, and was a 'banquet' complete with a bacon,orange and cheese starter, sausages or chicken as the main course and a chocolate dessert. Menu, budget, table setting, grace, hygiene as well as the 3 courses themselves are judged in this competition. The meal was carried on a table suspended from a 'flying broomstick' frame, and our meal placed 2nd overall.
 The Spare Time Activity has become our main parent involvement item at Kontiki- 4 or 5 families as well as all of the scouts on the supporters crew were involved in putting it together. The STA this year consisted of 3 seperate activities (a 'magical circle' made of clothes, as large as possible; a magical creature; and an awareness poster for the Troll Anti-Taunting League). Here is a photograph of our magical creature, which was a working, walking marionette, with a trunk that squirts yellow paralysing poising (also operated from the puppet controls) via a drip spliced into the trunk. Our STA placed 2nd.
 The fancy dress was planned and co-ordinated by our scouts, and consisted of a series of portraits talking to each other, 3 wizards and an appearance by Hagrid (extreme right of photograph).
Other photographs of our troop and our sister troop are available here - thanks to Marc for these photographs. Look out for updates over the coming days, including gateways, rafts and the tensegrity flagpole I mentioned above.
Subscribe to:
Posts (Atom)